
This is a guide to setting up the Box Office – SSBO tab so you are ready to start selling those tickets!
Go to the Box Office – SSBO tab in your management dashboard.
Here are some quick links to help you navigate this guide:
- Messages and Labels
- Booking Fees
- Artist Reporting
- Donations
- Splash Screen
- Membership or Pin-Badges
- Suspend Sales
- Miscellaneous
Options
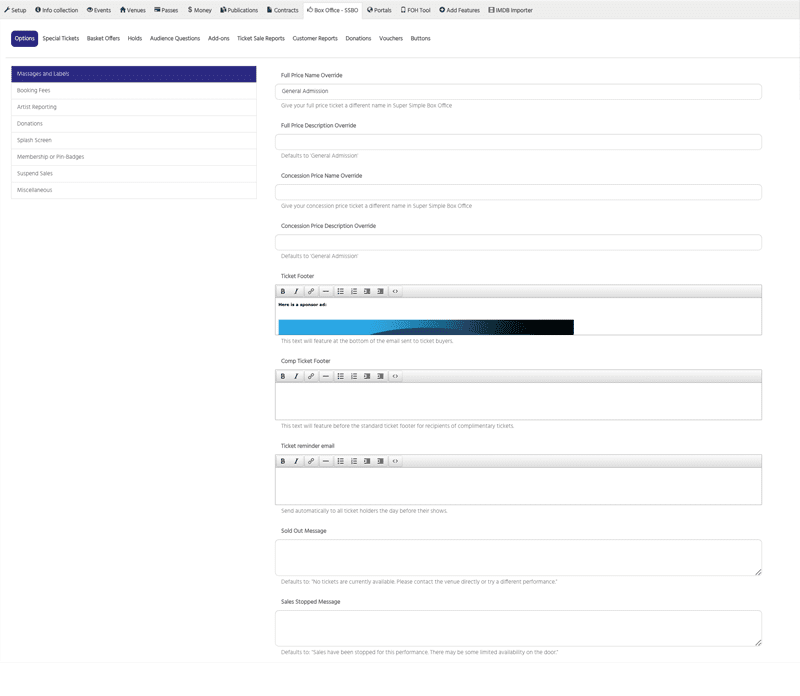
Messages and Labels
Full Price Name Override – Here you can give your full price ticket a different name in Super Simple Box Office if needed.
Full Price Description Override – Change the description of the Full Price ticket (Defaults to ‘General Admission’)
Concession Price Name Override – here you can give your concession price ticket a different name in Super Simple Box Office
Concession Price Description Override – Change the description of the Concession price ticket (Defaults to ‘General Admission’)
Ticket Footer – Here you can add some text to appear in the footer area of your tickets. If you are confident with HTML, you can change formatting and add images in the source code.
Comp Ticket Footer – This text will feature before the standard ticket footer for recipients of complimentary tickets.
Ticket Reminder Email – *Please note: this is an add-on feature and has to be activated by Eventotron* Send emails automatically to all ticket holders the day before their shows.
Sold Out Message – Change the sold out message. Defaults to: “No tickets are currently available. Please contact the venue directly or try a different performance.”
Sales Stopped Message – Change the sales stopped message. Defaults to: “Sales have been stopped for this performance. There may be some limited availability on the door.”
Booking Fees

If you wish to take ticket booking fees – put in the amount:
Per Ticket Fee (free) – enter a number (no currency sign) if you want to take a booking fee on free tickets
Per Ticket Fee (regular tier) – enter a number (no currency sign) if you want to take a booking fee per regular tier ticket
Per Ticket Fee (top tier) – enter a number (no currency sign) if you want to take a different booking fee on more expensive tickets.
Tier Threshold – The ticket price at which top tier fees kick in.
For example, all tickets under £10 are regular tier and all tickets over £10 are top tier, the tier threshold is 10
If you do not have a different fee for regular and top tier this can be left blank.
Fee Cap – Put a cap on the total booking fee per transaction. Please note that Stripe and Eventotron charges will continue to be applied and may therefore exceed the total booking fee in some limited circumstances.
Artist Reporting
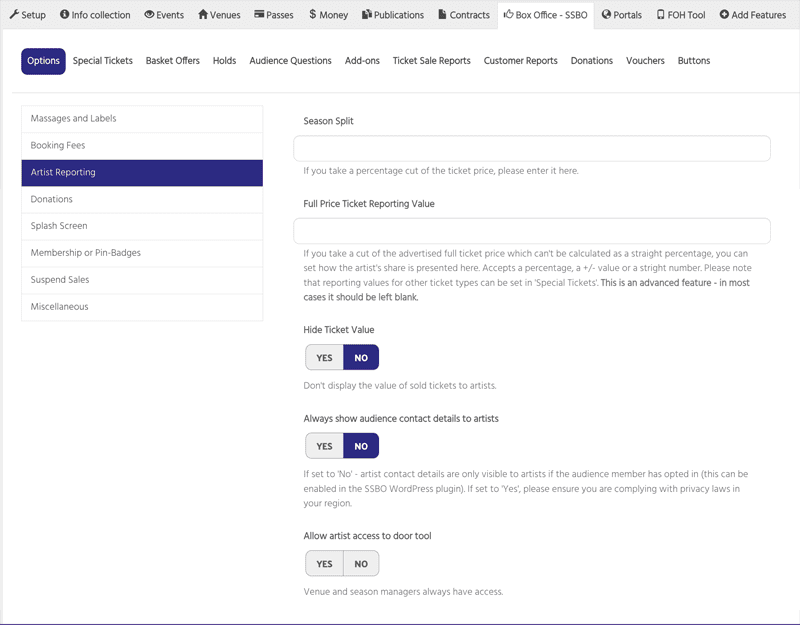
Season Split – If you take a percentage cut of the ticket price, please enter it here.
Full Price Ticket Reporting Value – If you take a cut of the advertised full ticket price which can’t be calculated as a straight percentage, you can set how the artist’s share is presented here. Accepts a percentage, a +/- value or a stright number. Please note that reporting values for other ticket types can be set in ‘Special Tickets’. This is an advanced feature – in most cases it should be left blank.
Hide Ticket Value – Select Yes to hide the ticket value of sold tickets to artists
Always show audience contact details to artists – If set to ‘No’ – audience contact details are only visible to artists if the audience member has opted in (this can be enabled in the SSBO WordPress plugin). If set to ‘Yes’, please ensure you are complying with privacy laws in your region.
Allow artist access to door tool – select Yes to allow artists access to the door tool. Venue and season / festival managers always have access
Donations
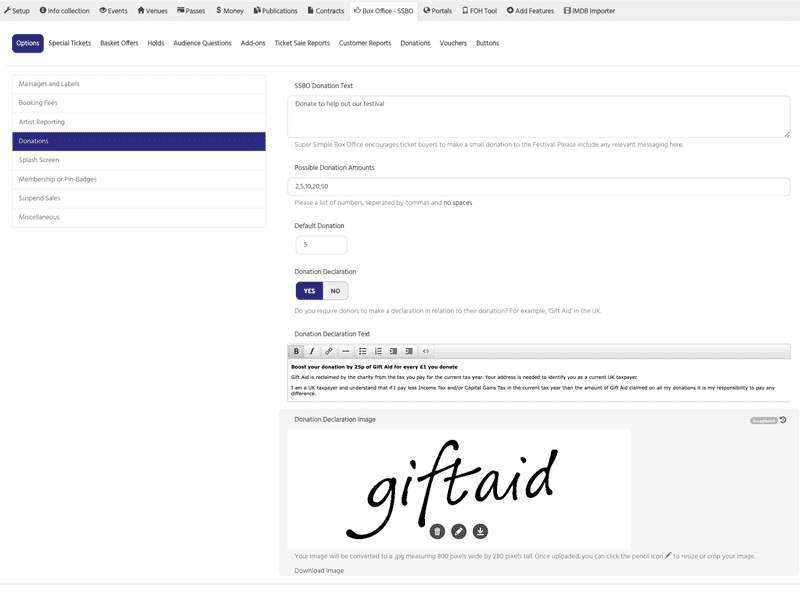
SSBO Donation Text – Super Simple Box Office encourages ticket buyers to make a small donation to the Festival. Please include any relevant messaging here.
Possible Donation Amounts – Please a list of numbers, seperated by commas and no spaces
Default Donation – enter the amount you want the donation option to default to
Donation Declaration – Do you require donors to make a declaration in relation to their donation? For example, ‘Gift Aid’ in the UK.
If answered YES – you will see:
Donation Declaration Text – here enter the text to display with your donation declaration. For eg:
Boost your donation by 25p of Gift Aid for every £1 you donate
Gift Aid is reclaimed by the charity from the tax you pay for the current tax year. Your address is needed to identify you as a current UK taxpayer.
I am a UK taxpayer and understand that if I pay less Income Tax and/or Capital Gains Tax in the current tax year than the amount of Gift Aid claimed on all my donations it is my responsibility to pay any difference.
Donation Declaration Image – Upload an image to accompany the donation declaration. Your image will be converted to a .jpg measuring 800 pixels wide by 280 pixels tall. Once uploaded, you can click the pencil icon to resize or crop your image.
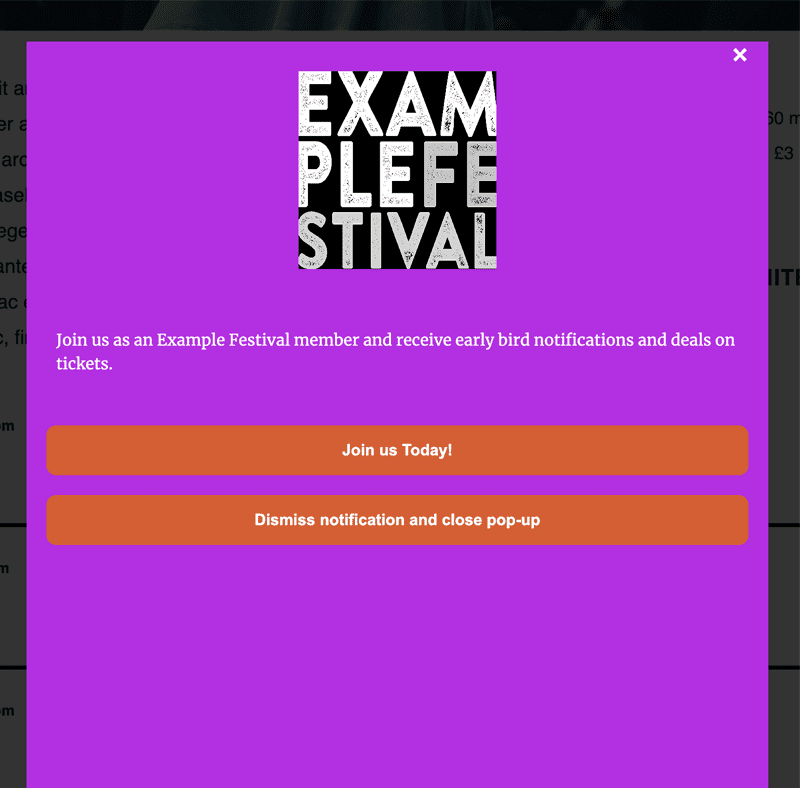
Splash Screen
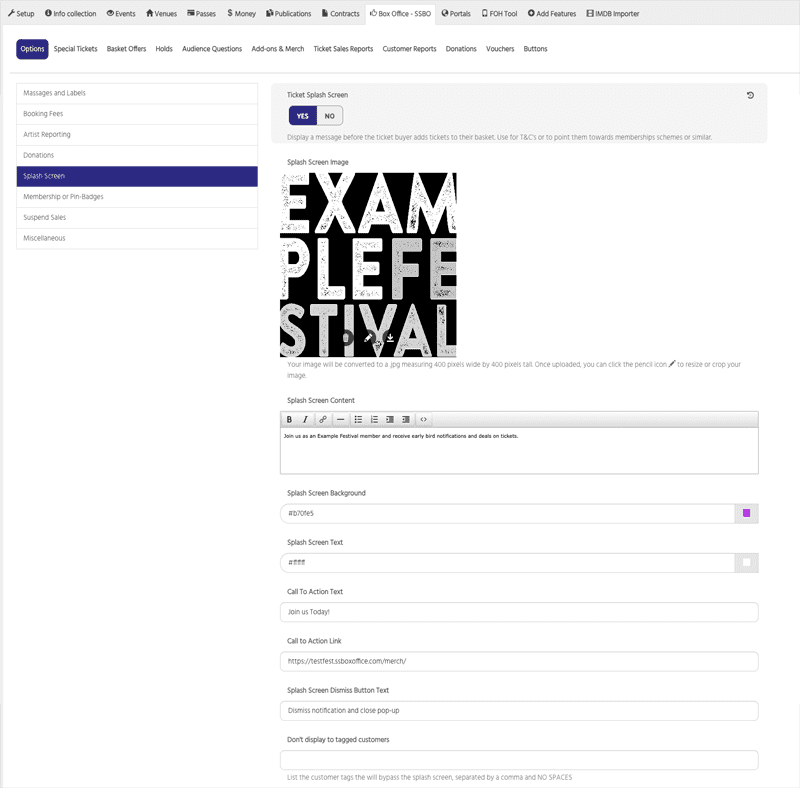
Ticket Splash Screen – flip to YES if you want to display a message to ticket buyers before they add tickets to their basket. Use for T&Cs, point them towards membership schemes or similar.
Splash screen image – upload an image to appear on your splash screen
Splash screen content – add text to appear on your splash screen
Splash screen background – choose a background colour for your splash screen
Splash screen text – choose a colour for the text on the splash screen
Call To Action text – this is a button that appears on the splash screen, this text should be short and explanatory, ie: Find out more about membership
Call to Action link – input the link for the call to action button (the membership info page in this example)
Splash Screen Dismiss Button Text – this is the button to dismiss the splash screen, this text should be short and explanatory, ie: No, take me to the box office.
Membership or Pin-Badges
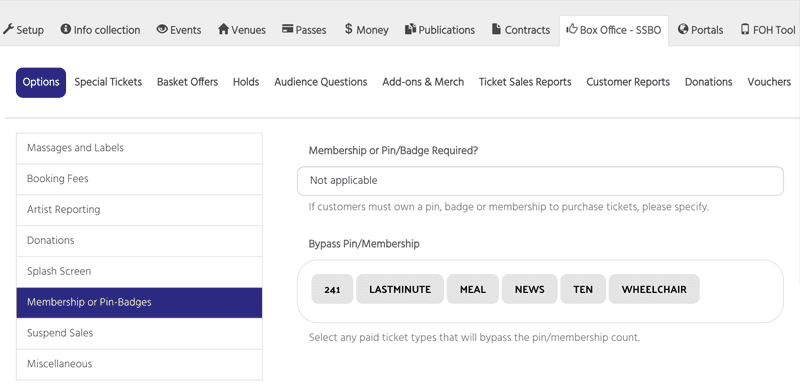
Membership or Pin/Badge Required? – If customers must own a pin, badge or membership to purchase tickets, please specify.
Bypass Pin/Membership – Select any paid ticket types that will bypass the pin/membership count.
Suspend Sales
Suspend All Sales – select YES to suspend all sales
Sales Suspended Message – Displayed to customers if they click a ‘Buy Now’ button when sales are suspended.
Allow Tagged Customers – Customers with this tag can bypass the suspension of sales.
Miscellaneous
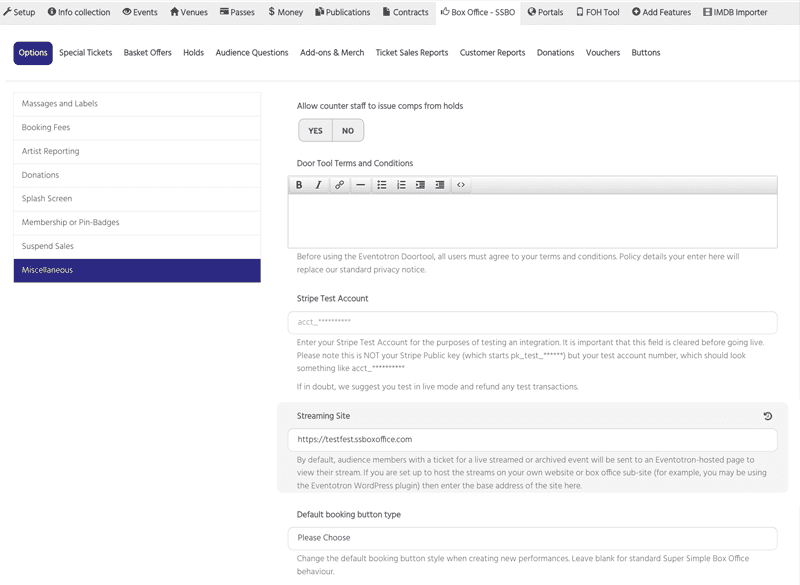
Allow counter staff to issue comps from holds – select YES if you want your counter staff to be able to issue comps from holds
Door Tool Terms and Conditions – Before using the Eventotron Doortool, all users must agree to your terms and conditions. Policy details your enter here will replace our standard privacy notice.
Stripe Test Account – Enter your Stripe Test Account for the purposes of testing an integration. It is important that this field is cleared before going live. Please note this is NOT your Stripe Public key (which starts pk_test_******) but your test account number, which should look something like acct_**********
If in doubt, we suggest you test in live mode and refund any test transactions.
Streaming Site – By default, audience members with a ticket for a live streamed or archived event will be sent to an Eventotron-hosted page to view their stream. If you are set up to host the streams on your own website or box office sub-site (for example, you may be using the Eventotron WordPress plugin) then enter the base address of the site here. Only applicable if you program live streamed or archived digital shows.
Default booking button type – Change the default booking button style when creating new performances. Leave blank for standard Super Simple Box Office behaviour.
Special Tickets
Here you can create special ticket types and apply them to individual performances or events. Here’s how:
Click on New ticket type…
We’ll use a 2 for 1 offer as an example.
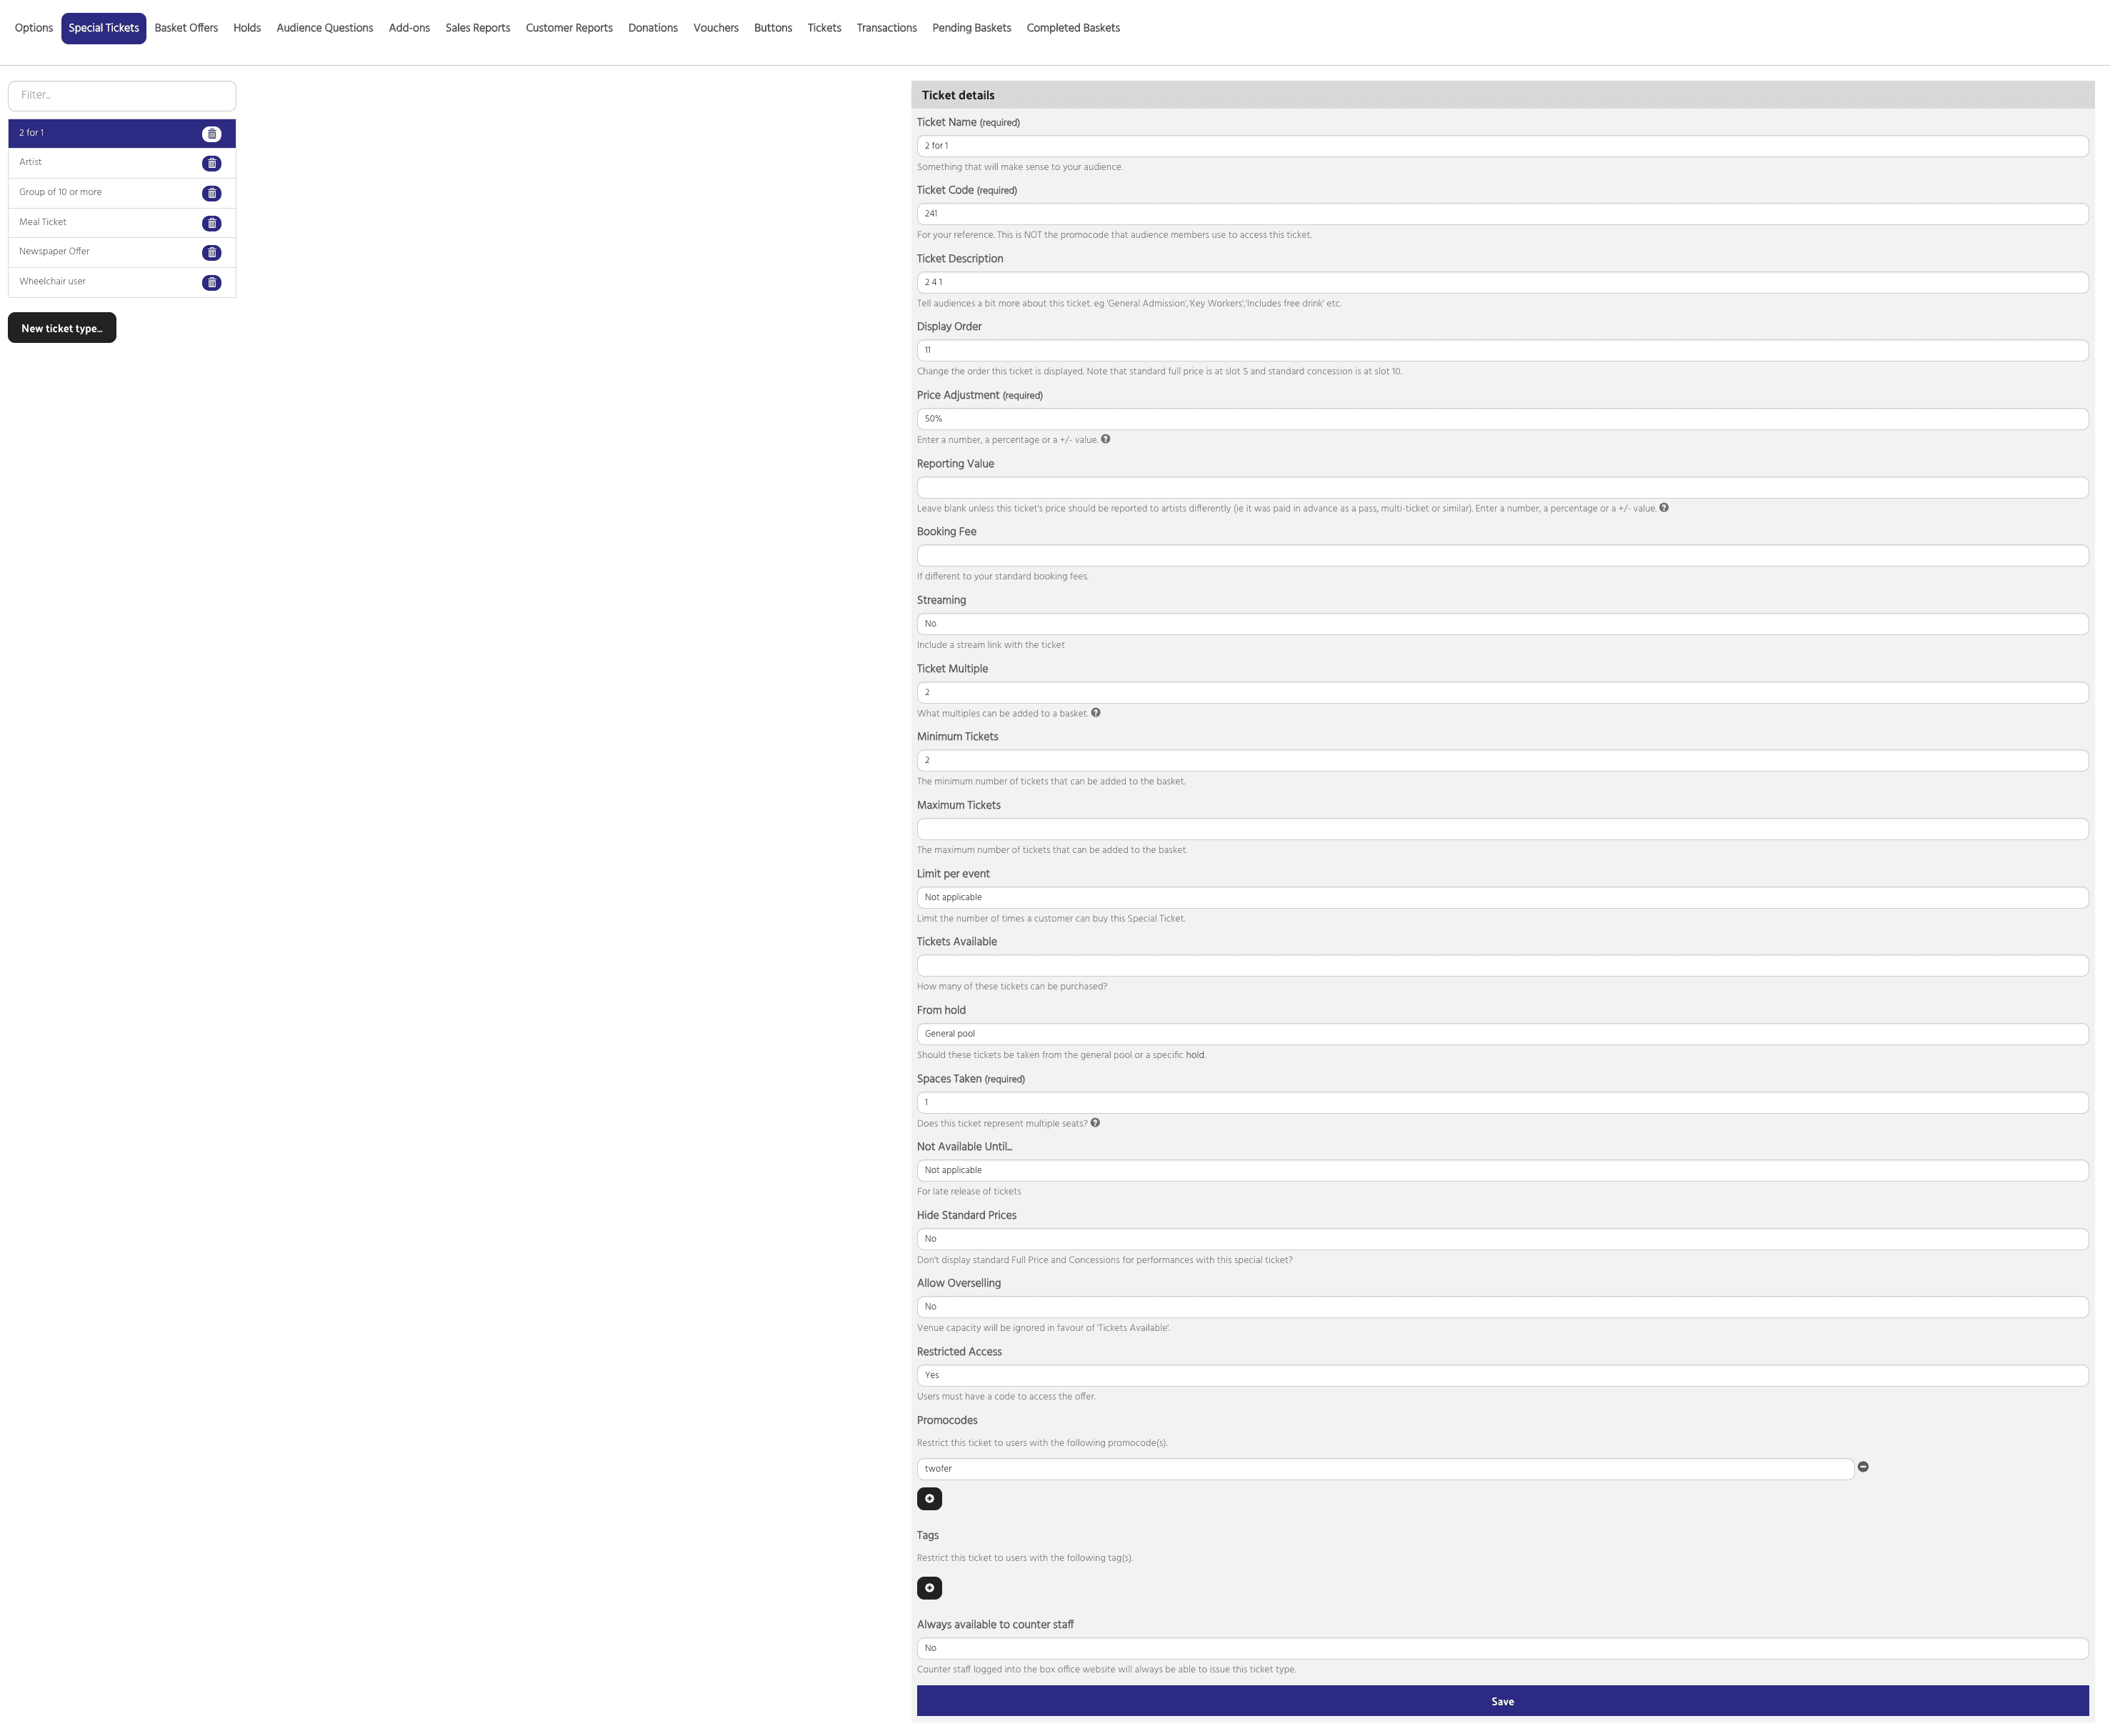
Ticket Details
Ticket Name – this needs to be something that will make sense to your audience. In this case we’ll call it 2 for 1
Ticket Code – for your reference. This is NOT a promo code that audience members use to access this ticket.
Ticket Description – this is audience facing so a short description giving more detail about the ticket
Display Order – Change the order this ticket is displayed. Note that standard full price is at slot 5 and standard concession is at slot 10.
Price Adjustment – enter a number, a percentage or a +/- value. For this example we’ve inputted 50%
Reporting Value – Leave blank unless this ticket’s price should be reported to artists differently (ie it was paid in advance as a pass, multi-ticket or similar). Enter a number, a percentage or a +/- value.
Booking Fee: If different to your standard booking fees.
Streaming – select Yes if you want to include a stream link with the ticket
Ticket Multiple – what multiples can be added to a basket. In this instance enter 2 – meaning tickets must be bought in pairs
Minimum Tickets – The minimum number of tickets that can be added to the basket. For this example it’s 2.
Maximum Tickets – The maximum number of tickets that can be added to the basket.
Limit per Event – Limit the number of times a customer can buy this Special Ticket. You can do this by tag count or choose a number.
Tickets Available – how many of these tickets can be purchased?
From hold – Should these tickets be taken from the general pool or a specific hold.
Not Available Until… – For late release of tickets – if you want this special ticket to become available at a specific time, select the time from the dropdown.
Spaces taken – does this ticket represent multiple seats? In this example, each ticket represents 1 space taken
Hide Standard Prices – indicate whether or not to display standard Full Price and Concessions for performances with this special ticket
Allow Overselling – select Yes and venue capacity will be ignored in favour of ‘Tickets Available’.
Restricted Access – Users must have a code to access the offer – we’ve chosen Yes in this example
Promocodes – Restrict this ticket to users with the following promocode(s).
Always available to counter staff – select Yes if you want counter staff logged into the box office website to always be able to issue this ticket type.
Tags – Restrict this ticket to users with the following tag(s)
Then hit Save
Now go to Applying the Ticket to in the right hand column and click +
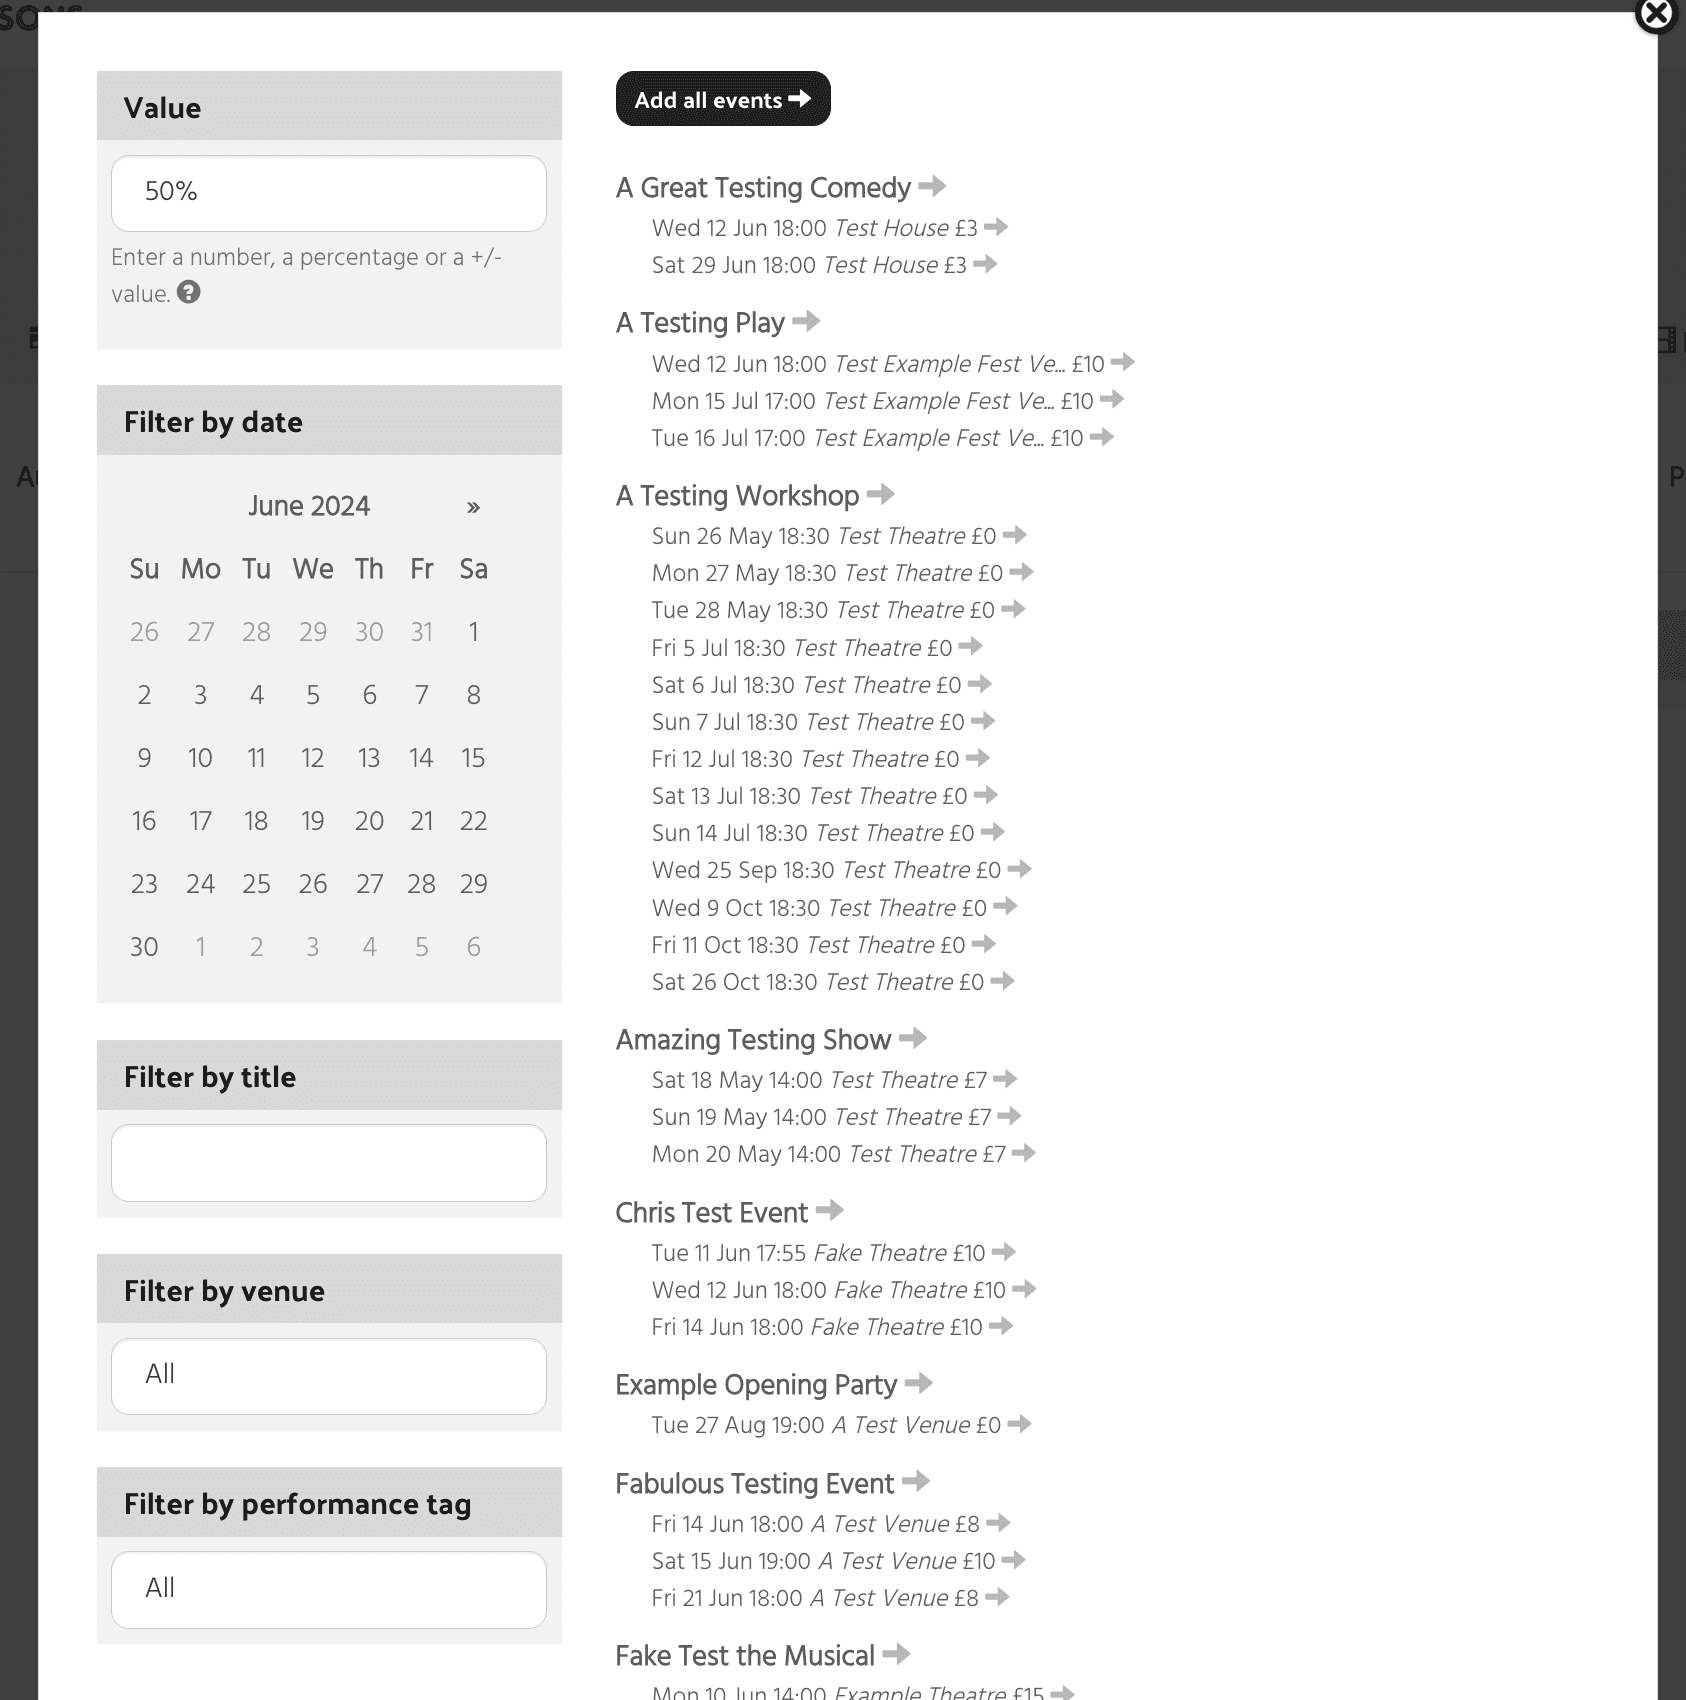
You can filter your events by date, title, venue or performance tag. Click the arrow/s next to the event or individual performances you want this ticket offer to apply to
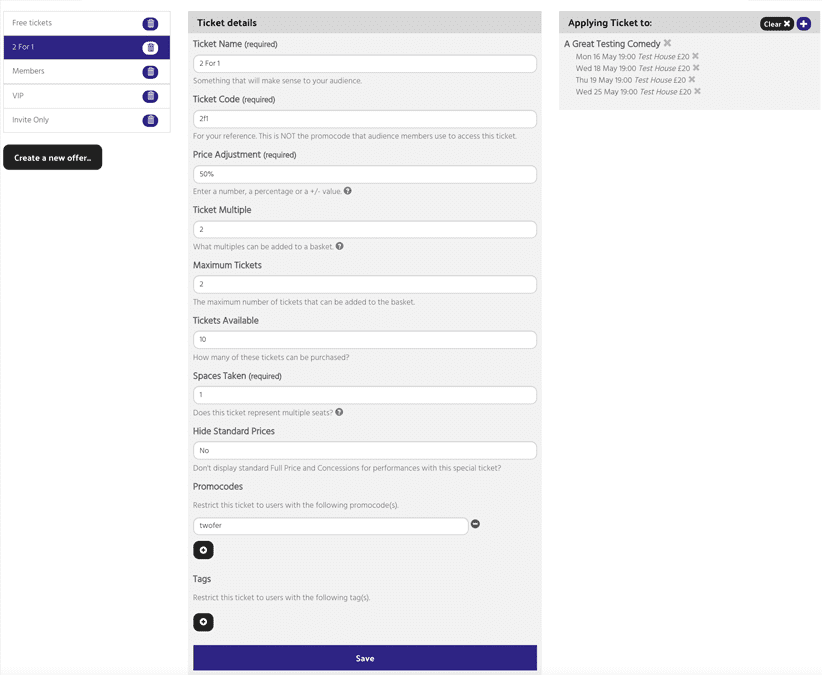
Click Save at the bottom of the page.
Basket Offers
This gives you the ability to run offers based on what the customer has put in the basket. If you want to give a discount when tickets for 3 different events are purchased at once, for example, then you would set up a Basket Offer like this:
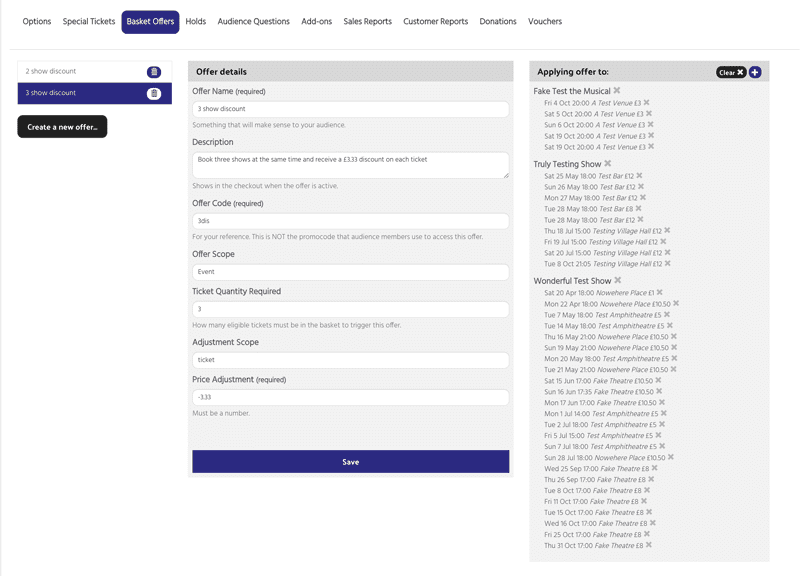
To set up a Basket Offer, click Create a new offer
Offer Name – give the offer a name that will make sense to your audience (for example: 3 Show Discount)
Description – This will display in the checkout when the offer is active
Offer Code – for your reference (this is NOT a promo code for the audience to access the offer)
Offer Scope – Is Event
Ticket Quantity Required – this is the minimum number of tickets required for the offer to activate. In this example it is 3
Adjustment Scope – Is ticket
Price Adjustment – this is per ticket, so in this example the offer is £3.33 off each ticket when booking for 3 shows at once, so the price adjustment is -3.33
Click Save
Click the + next to Applying the Offer to and hit the arrows next to the events you want the offer to apply to.
This is how the offer looks in the basket:

Holds
This is where you can create holds, effectively putting tickets aside for your specified groups on applicable performances.
Create a new hold…
Hold details
Hold Name – for example: Press
Hold Access – Select who can access the hold (Season / Festival Manager, Venue Manager, Event Manager / Artist)
Available to sell – select whether the hold can be sold if not taken up.
Release – Select a time when the hold can be released for sale
Tickets to hold – maximum number of tickets to hold.
Shared hold – shared holds are spread across all selected performances/sessions of an event. If you select NO – the tickets to hold will be on a performance by performance level (so in this example, 4 tickets will be held for Press at every performance it is applied to)
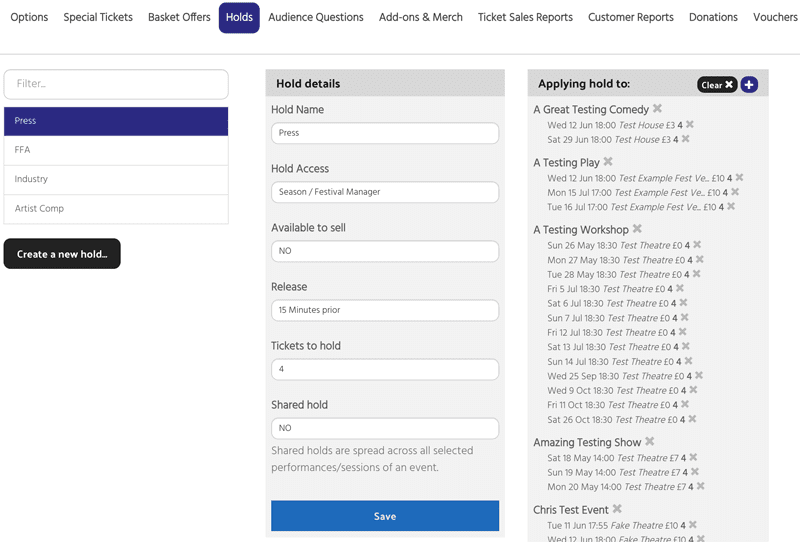
Click Save
Now click Applying offer to… +
Select the performances you wish to apply the hold to.
Click Save.
To view and allocate your holds – go to the event/performance you have applied holds to via the Events tab in the management dashboard. Click on Dates, Times & Prices. Click the Details button under the specified performance.
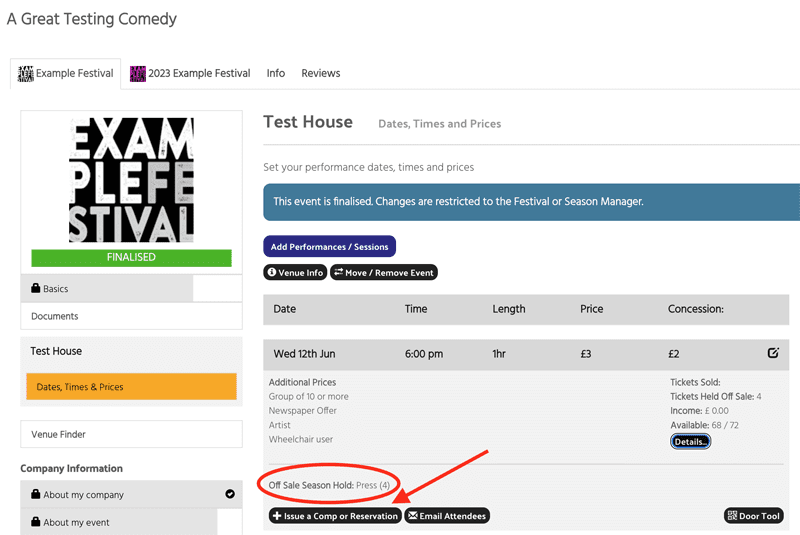
You will see the Event Hold listed. To allocate a hold click +Issue a Comp or Reservation
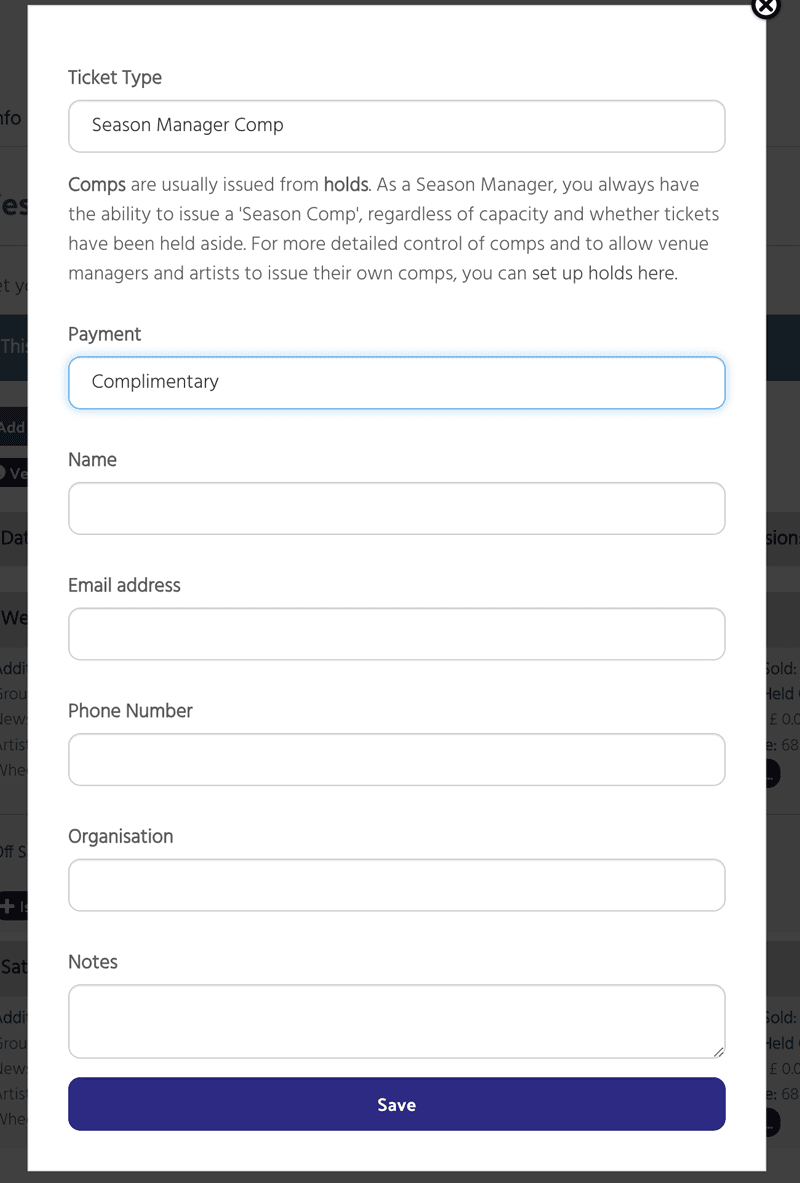
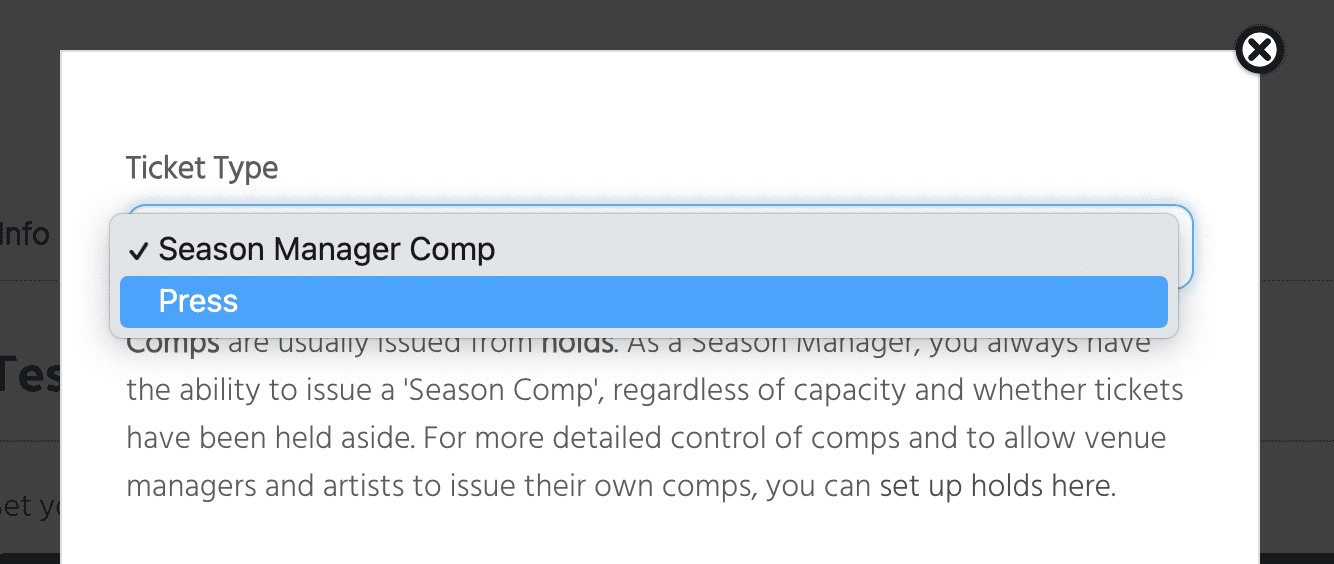
Ticket Type – As a Season Manager, you always have the ability to issue a ‘Season Comp’, regardless of capacity and whether tickets have been held aside. Click on the field to see the dropdown:
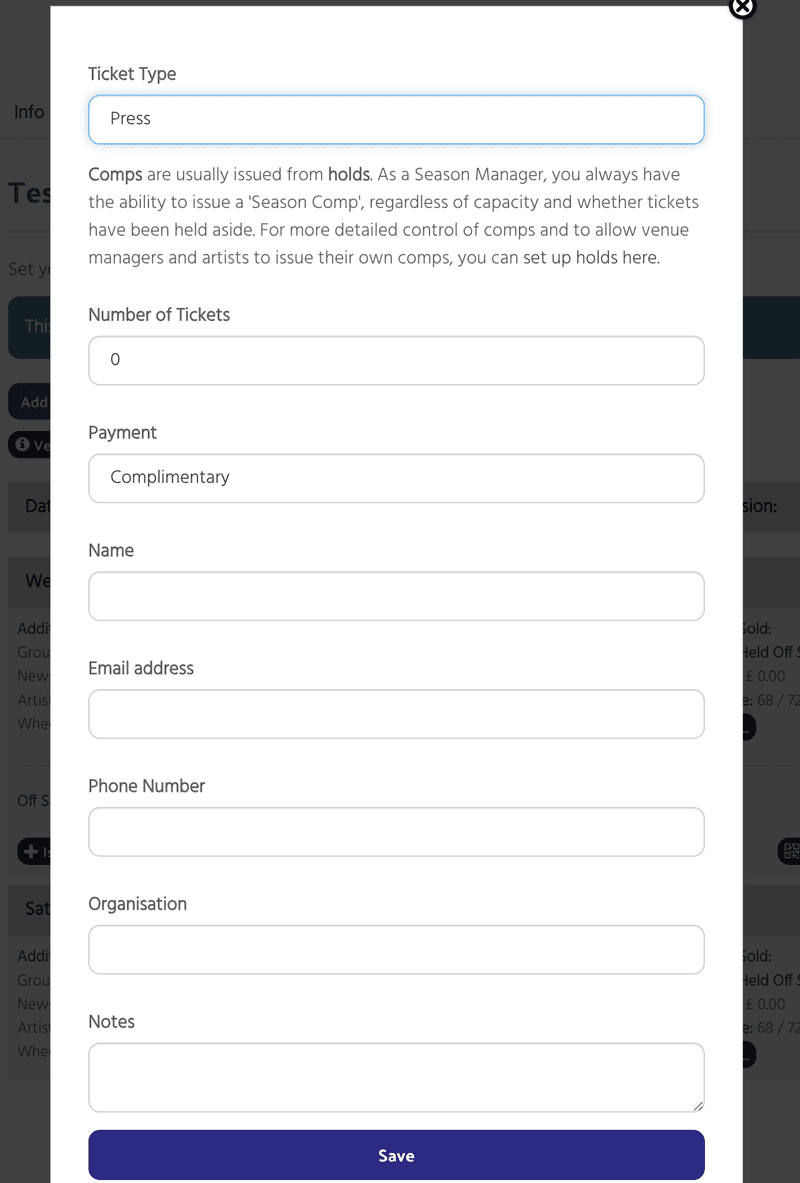
Select the number of tickets
Payment – Select whether this is complimentary or a reservation to be paid for on the door
Input the customer information – name, email, phone no, organisation and notes.
Hit Save.
You will see your hold listed and the attendee will have received an email ticket.
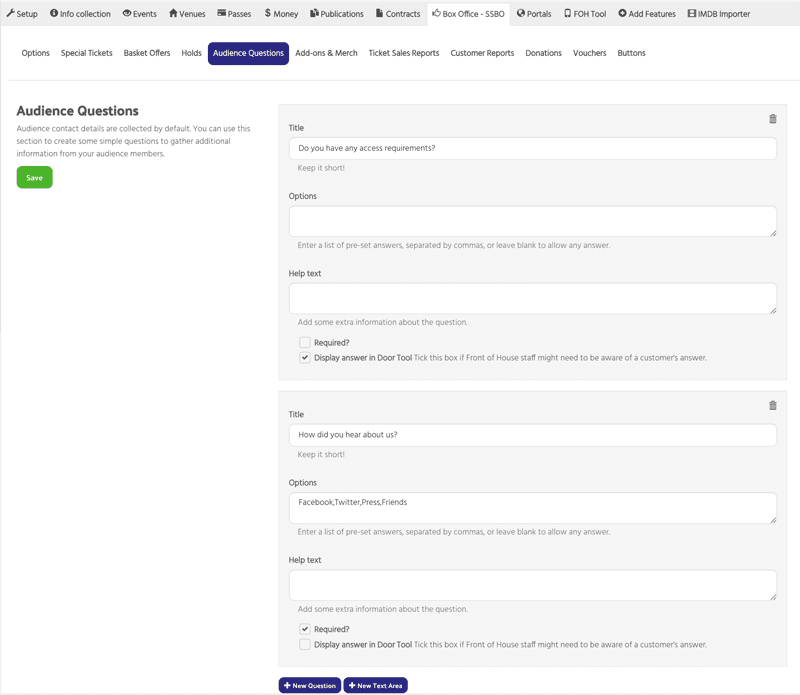
Audience Questions
Audience contact details are collected by default. You can use this section to create some simple questions to gather additional information from your audience members.
You can make questions required and select Display in Door Tool if you want Front of House staff to be aware of a customer’s answer (eg: if a customer has access requirements)
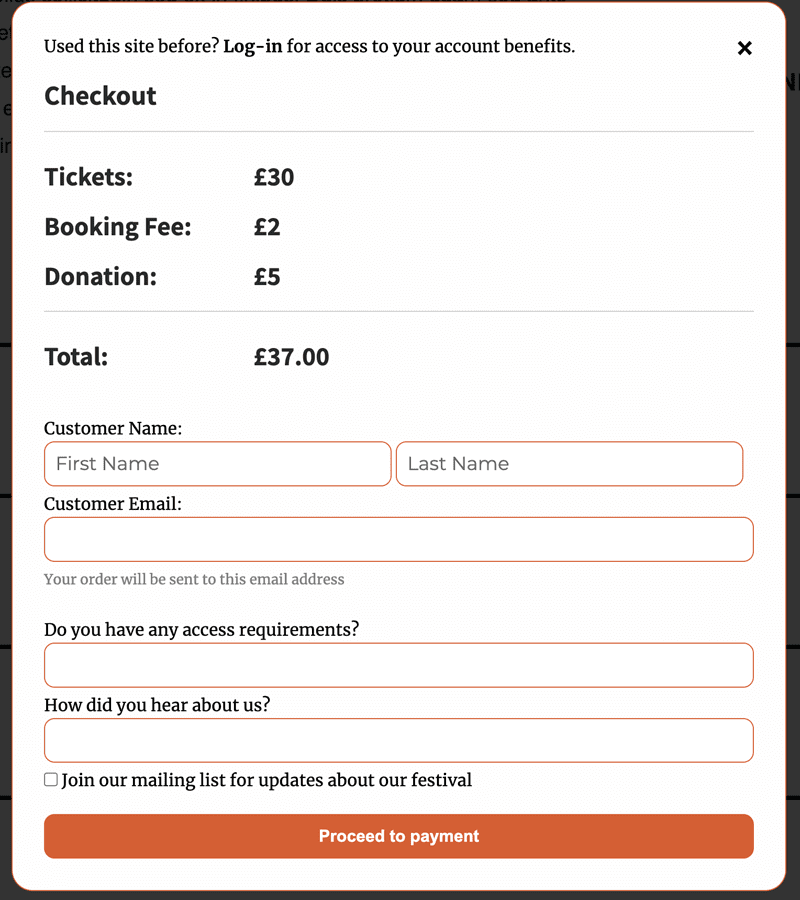
You can also add explanatory text which appears at the Checkout point of the ticket sale:
Here’s how this looks on the frontend of your website:
Add-ons & Merch
Create items that can be sold to audience members and your event managers. Items you create can be placed within your registration questionnaires and/or in your Super Simple Box Office checkout.
Whats a SKU? It stands for ‘Stock Keeping Unit’. Every item must have at least one SKU. So for example, your item might be ‘Tote Bag’ and you might have ‘Red’ and ‘Green’ and ‘Pink’ SKUs, each with their own inventory, description and even pricing.
Click Create an Add-on
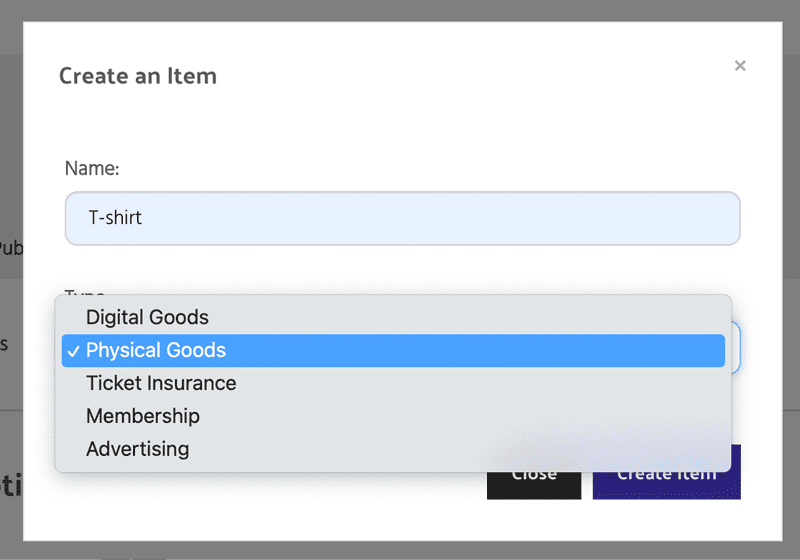
Give your add-on a name and choose the type (Digital Goods, Physical Goods, Ticket Insurance, Membership, Voucher, Advertising)
Click Create Add-On
Item Options
Name – here you can edit the name you inputted if needed
Description – explain what the add-on is
Include in SSBO checkout flow – choose whether you want the item to appear in the checkout flow for the customer. You can select ‘Staff Only’ if your are selling a physical item at your sales counters that is not available to buy online
If you select YES to include the item in the checkout flow you can choose whether the item is available when a customer is purchasing tickets for any event or specific events (an example of when you might use this is if you are selling a play script for one of your events)
Tag – Set if this add-on is limited to tagged customers only.
Message to non-tagged customers – If you have limited the item to tagged customers only – you can enter a message here for non-tagged customers explaining why they cannot purchase (for example – you have to be a member to access a multi-buy pass)
Status – set to Available, Sold Out or Hidden as appropriate.
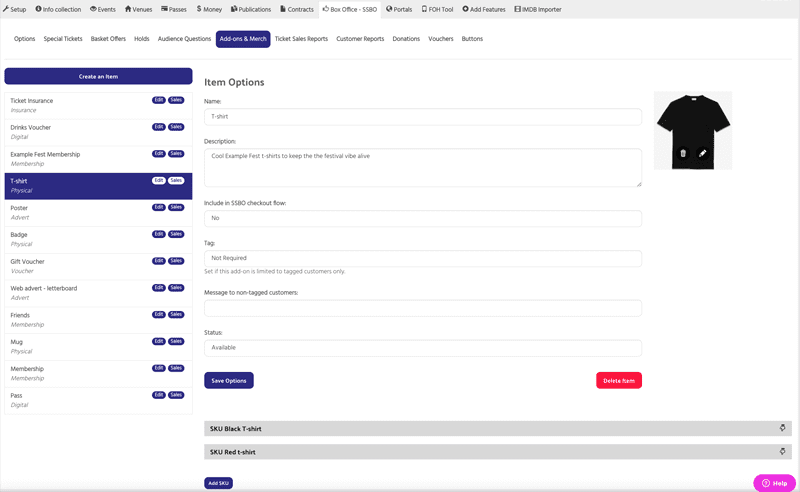
Save options
SKU – Stock Control Unit
Give it a name
Description (if different to the main item description)
Price – enter the price
Internal price – enter if different to the price
Add Tax – select No or the appropriate tax rate
Require a delivery address – select Yes for physical items that need to be mailed out to purchasers
Status – select available, sold out or hidden
Per Sale – select whether single or multiples of the item can be purchased in one transaction
Tag – Tag customers who purchase the item (for eg: Member)
Ticket Note – Enter any text you want to have appear on the ticket
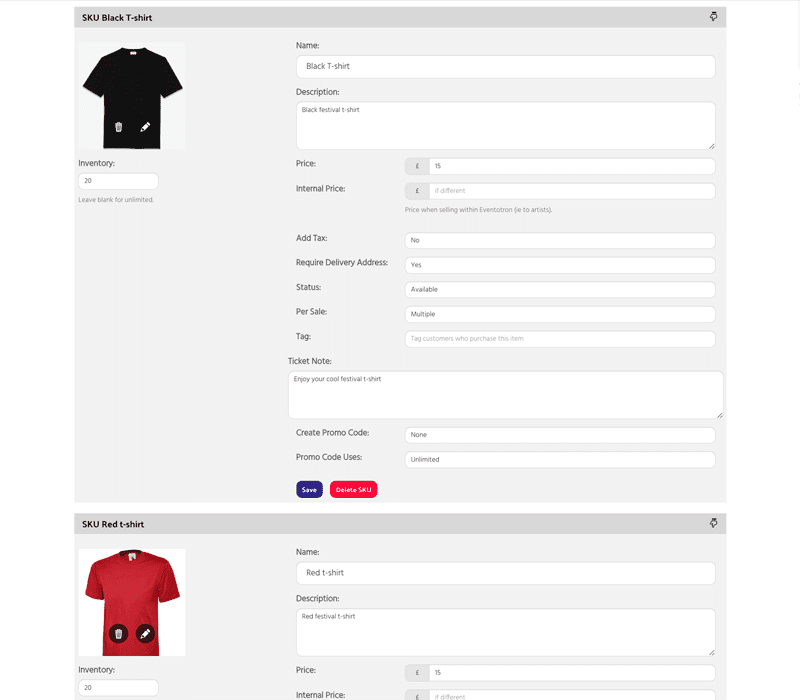
Click save.
If you have further SKU, click Add SKU and complete the form.
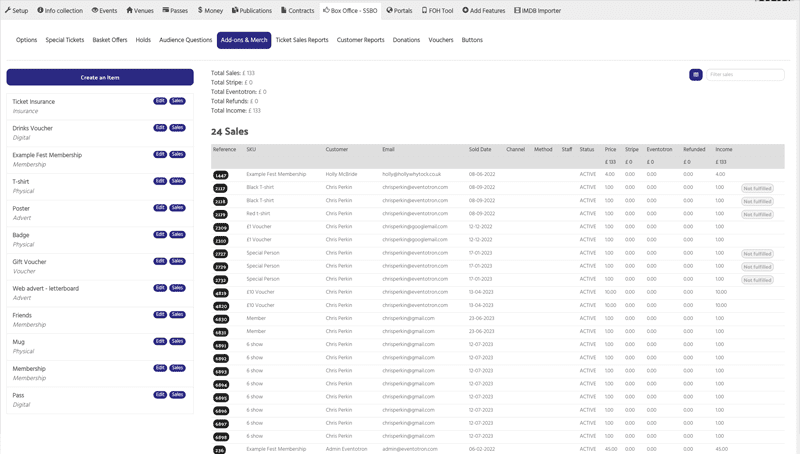
You will see sales, customer details and fulfilment (on physical goods) in the Add-ons & Merch tab:
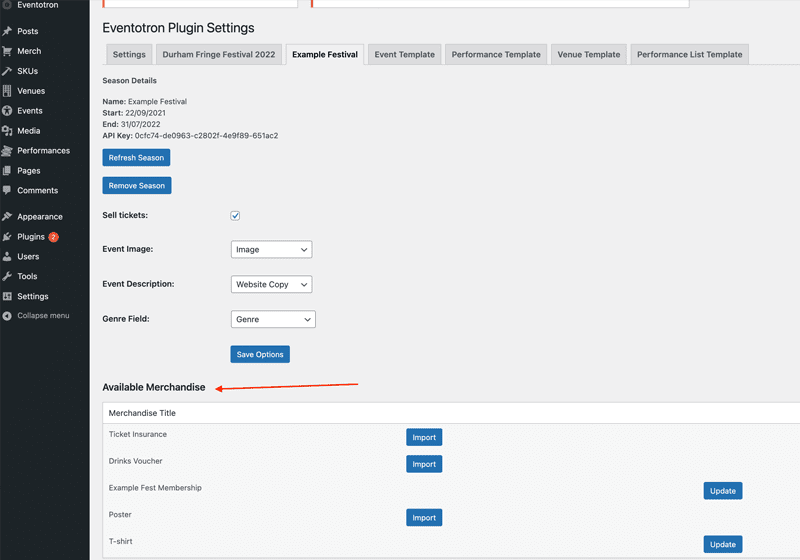
Once you have completed your Add-On set up, log into your wordpress website and go to Eventotron Settings in the dashboard. Click on your festival/season tab and Refresh Season. You will see your add-on/s appear under Available Merchandise in a similar way to Events. Import.
The plugin creates posts for add-ons in a similar way to events – the posts will appear here: https://yourwebsite.url/merch/