
A Guide for Venue Managers
This guide will help venue managers set up their own events or accept other events applying to their venue.
Accepting applications from Events
Once your venue is part of a festival / season, artists and producers can find out about your venue and approach you through Eventotron if they are interested in performing with you.
For detailed help setting up a venue and joining it to a festival / season, please see our Creating a Venue guide. In summary, you will need to do the following:
• Make an Eventotron Account
• Create a Venue
• Fill in the basic information about your venue
• Click +Join a festival from your venue’s page. Some festivals/seasons will admit your venue instantly, while others may ask for further information and then take time to approve your application.
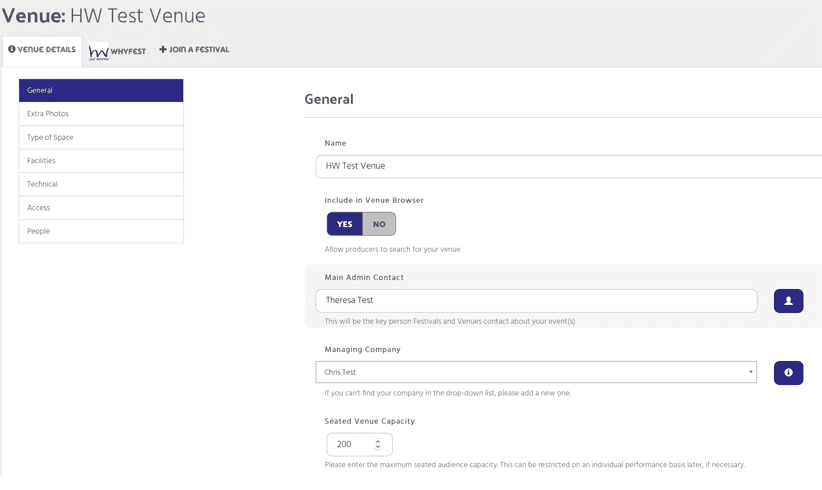
You will now see a tab for the festival/season on your venue’s homepage. Before you go into this section, be sure to set ‘Include in Venue Browser’ to ‘Yes’ in the Venue Details / General section – this will ensure artists and producers can find your venue. You should also have filled in as much detail as possible in all the Venue Details sections so applicants have a good idea of what your venue offers.
Next, click on the festival tab in your venue’s homepage and then ‘Settings’:
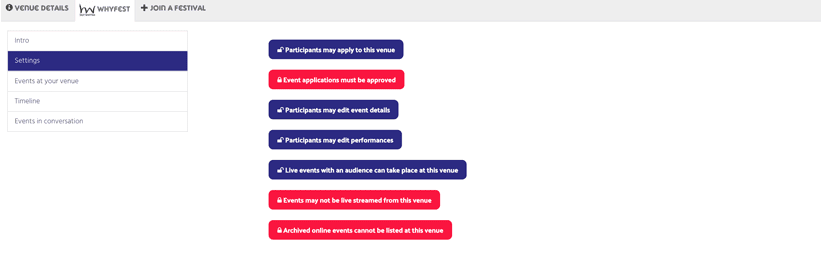
A festival or season will typically require a lot of information from an event. In the ‘Settings’ section you, as the venue manager, can set how much control events at your venue have over the information they provide to the festival/season.
You can lock ‘Participants may edit event details’ if you would prefer to fill out all the festival’s/season’s application forms on behalf of the event. You can lock ‘Participants may edit performances’ if you want to keep control of performance dates, times and prices. If you leave this section unlocked, artists and producers will be able to set their own dates, times and prices at your venue.
You are now ready to start considering event applications.
Accepting Event Applications
When an event joins a festival/season, they will be presented with a number of questionnaires to fill in. In many instances, events will search for venues and apply to them as part of the process of completing their registration questionnaires. When an event expresses an interest in performing at your venue, you will receive an email notification. To see the message, click on the link in the email or go to your venue in Eventotron, click the festival/season tab in your venue and then click on Events in conversation:
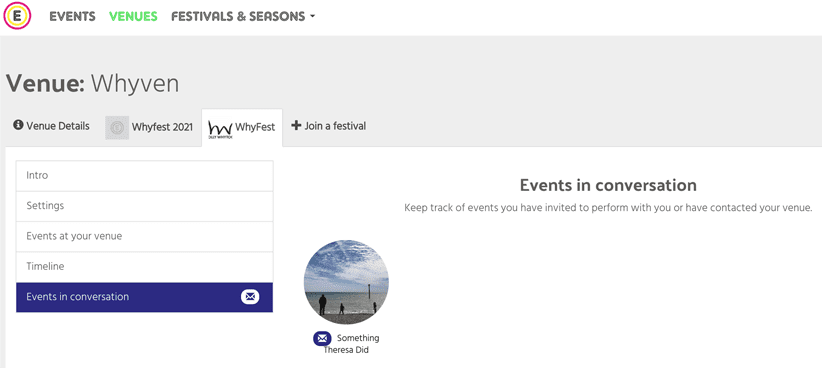
An email icon will indicate pending messages. Click on the circular event icon to read any messages, respond and to confirm your interest in the event. If you chose not to confirm your interest, the event will stay in the Events in conversation section. Those you confirm will now appear in the Events at your venue section.
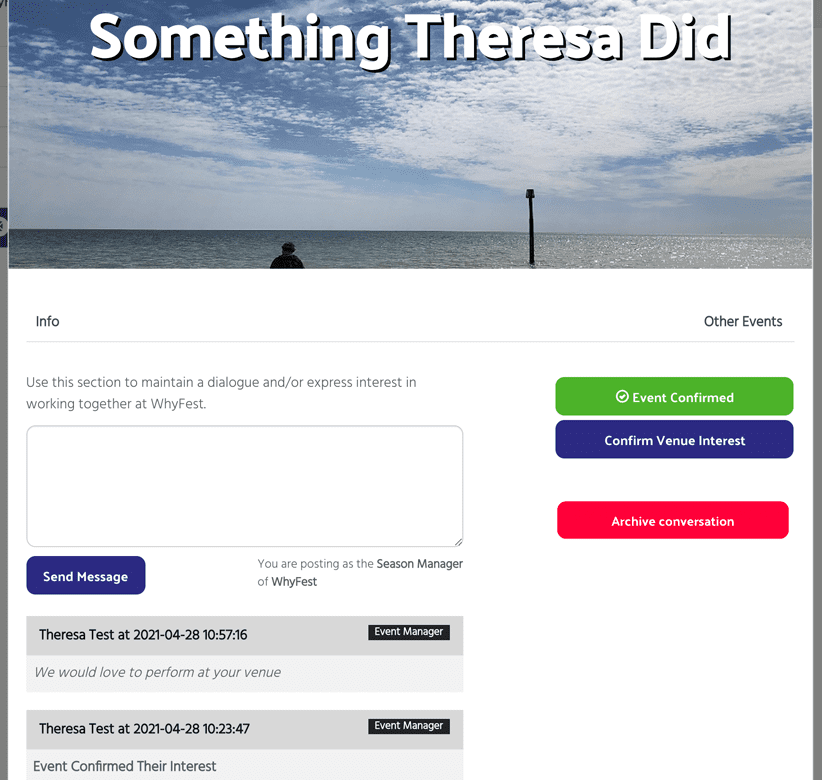
When you send a message or confirm venue interest the event will be notified. If you need to know more about the event before confirming your interest, just click the event’s name and you will be able to view the event’s main information.
If you make an offer to the event and they accept, you will be able to edit performance information (dates, times and prices) in line with whatever policies your venue may have in place. Please note that an event may need to consider multiple venue offers. If they accept your offer you will be notified by email and the event will appear in the Events at your venue section.
Archive Conversations
If you don’t wish to continue a conversation with an event – hit the Archive conversation button and this will move the event into your archived conversations section. An event you have archived will be notified.
Other ways to add an event to your venue
If you produce your own shows you can add them to your venue quickly.
If your event is already in Eventotron:
Just choose Festivals & Seasons from the top menu, find the festival that your venue is part of and follow the application process. Some festivals let events join automatically, others may ask you to fill out an application form and then wait for it to be considered or for a lottery draw. Once your event is part of the festival, you will see a section in the left hand menu relating to venues. Click this and then search for your venue. Click ‘more info’ and then ‘apply to venue’. Because you are both the event manager and the venue manager, the venue application / offer process will be skipped and the event will become part of your venue for this festival/season.
If your event is NOT already in Eventotron:
Click Events’ in the top menu and then +Create a new event:
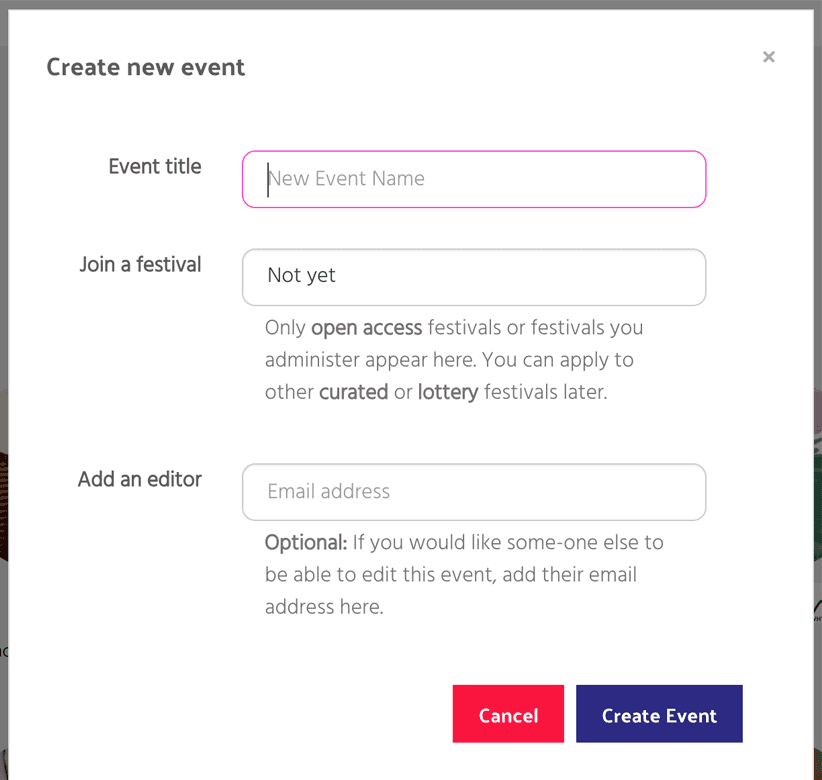
First of all, give your event a title. If the festival/season you want to join is ‘Open Access’ (ie It is not curated and / or does not use a lottery selection process) then you can opt to join the festival immediately from this dialogue box. Furthermore, if you mange a venue that is part of the festival/season you select, you can add it to that venue here too, so it’s a very quick way to get events up and running.
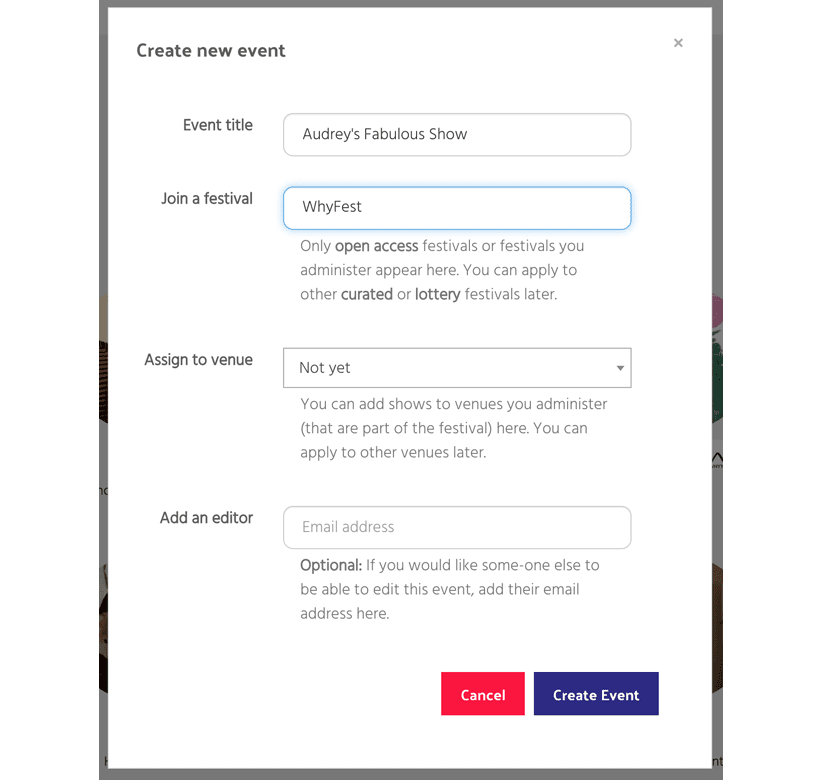
If the festival is not open access, you should create the event from this dialogue box and then follow the instructions for ‘If your event is already in Eventotron’. Finally you have the option to add an event editor. You should only do this if you are creating the event on behalf of someone else. For instance, you may have agreed offline that you are welcoming an event to your venue. Put the event producer’s email address in here and Eventotron will create an account for them (or notify them if they already have an account) and give them editing access to the event.
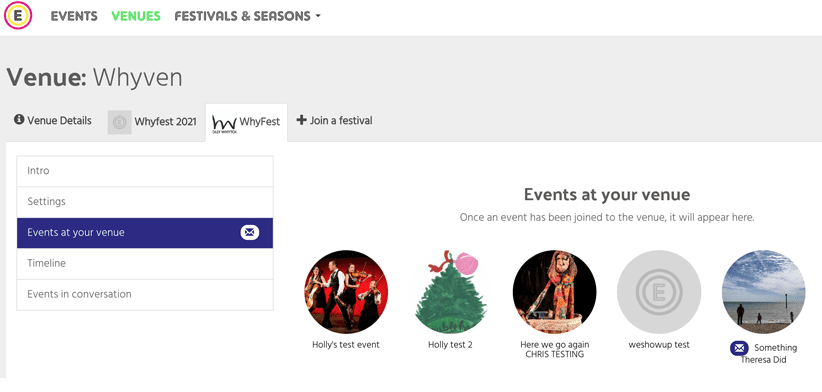
What to do once an event has been added to your venue
Once an event is part of your venue’s line-up, you have the ability to edit their festival/season application in the same way that the event producer or artist would. Click on the Events at your venue section in the festival/season tab:
Find the show you’d like to edit and click the title to go to their festival registration:
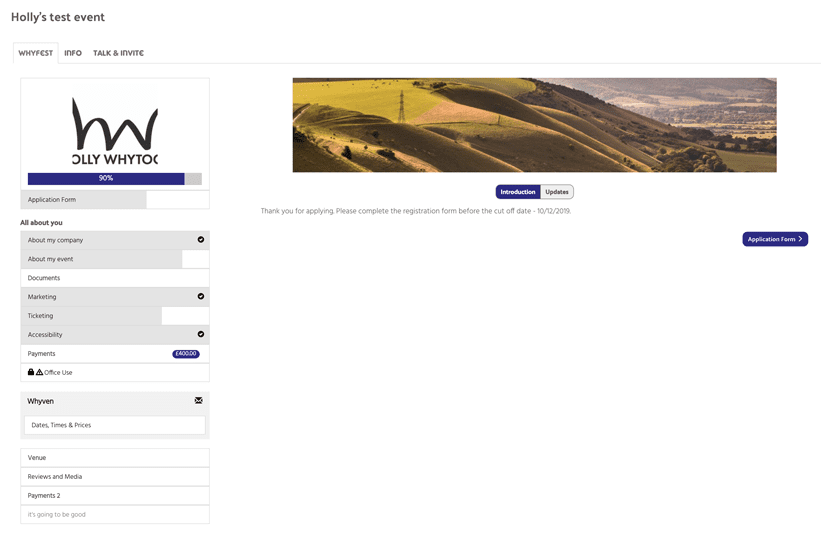
Go through the sections on the left to review what the event producer has already entered and make any necessary changes or additions. Remember – if you previous locked participants out of editing event details, they will no longer be able to edit their registration and it will be up to you as the venue manger to complete all the forms and finalise the event.
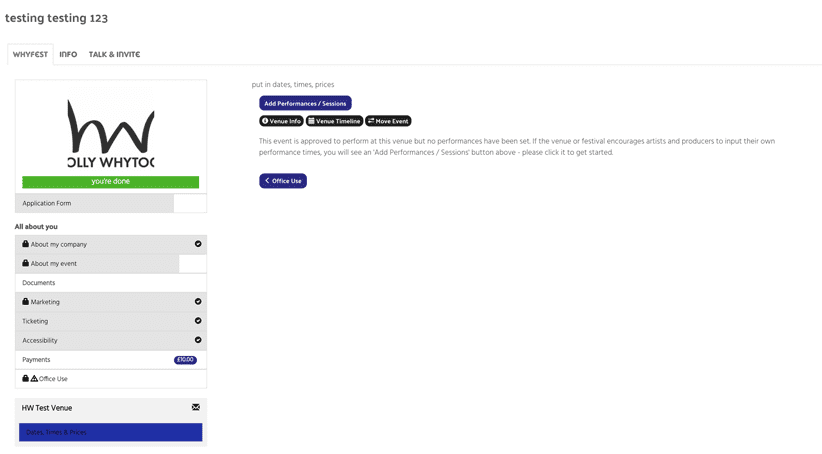
Setting Performances – Dates, Times and Prices
Most festivals / seasons will need an event to have some performance dates, times and prices set before the event registration is considered complete. Depending on how you have set up your venue, event producers or artists may be locked out of adding performances. Alternatively, you may allow your artists and producers to set their own performance details but need to review them. To create performances, find your venue in the left hand menu, and click on ‘Dates, Times and Prices’ beneath it:
Click the ‘Add Performances’ button to bring up the following box:
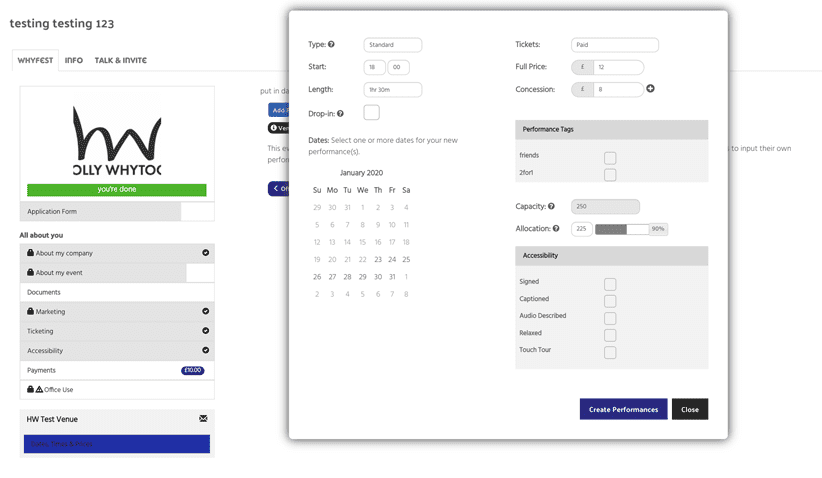
You can easily add multiple performances if they share times and prices. Just fill in the details and select the dates. If your event takes place at multiple times or has different prices on different days, just repeat the process for each set of performances. ‘Drop-in’ should only be selected if you want to signal to an audience member that they can turn up at any time during the event’s duration. For example, the event may be an art installation or exhibition that runs all day and audiences need not turn up at the advertised start time. Depending on the festival / season, you may also be able to set whether a performance is free, paid or pay what you want on the door (with or without the option to pre-buy at a set price).
You can also set any other concessions that the festival / season offers and say whether a performance is taking part in any special ticket offers or membership schemes. Again, depending on how the festival / season is set up, you may be able to adjust the capacity of the venue on a performance by performance level. You may be required to set the allocation of tickets that you will allow the festival’s / season’s box office to sell on your behalf. For example, if your venue has 100 seats and you would like to make 40 tickets available through the festival / season box office and sell the other 60 from your own outlets, the capacity would be 100 and the allocation would be 40%.
Finally, you have the option to specify what accessibility options the performances have. Click the ‘Accessibility’ box to expand the panel and choose the correct offers (for example ‘Audio Described’, Relaxed’ etc). Hit ‘Create Performances’:
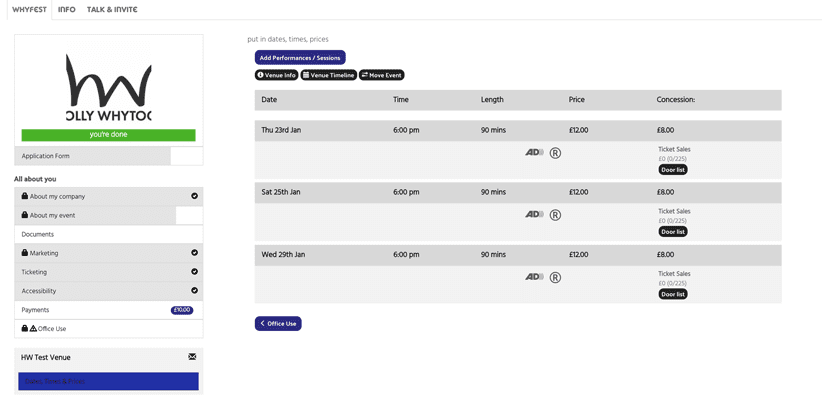
If artists or producers are locked out of making changes to dates, times and prices they will still be able to see this view as a reference. Add more performances if necessary. To edit or delete an existing performance, click on the top grey line of the performance and your options will appear to the right of the screen:
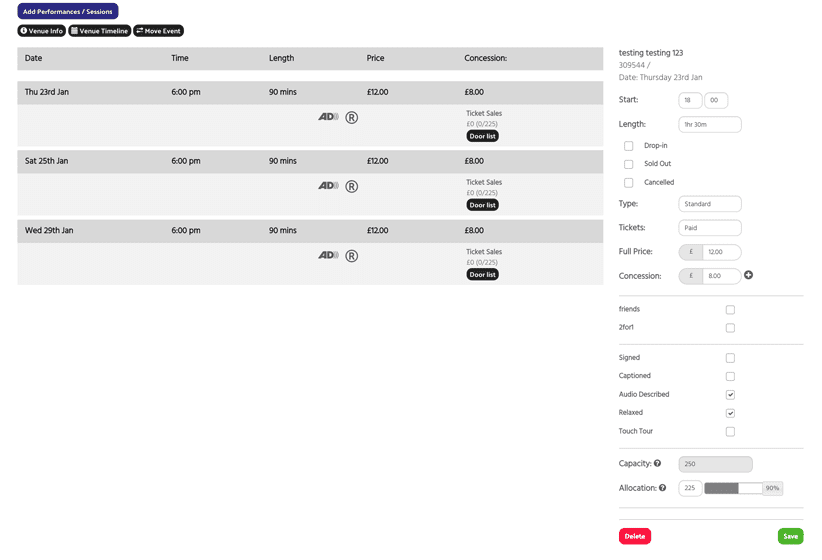
Remember to hit save when you have made changes. You will be then be asked if you would like to apply those changes to other performances which is a quick option to, for example, change your prices across all performances.
Timeline
Use the Timeline section in the festival or season tab of your venue to view your venue schedule.

Change performance dates and times by simply dragging and dropping, you will be prompted as to whether you’d like to apply changes to all performances of that event:

To make changes to prices, accessibility etc, click on the performance you wish to edit in the timeline and a pop-up will appear. Make edits and click save. You will again be prompted as to whether you’d like to apply the changes across all performances of that event if required.
Finalising Events
As you or the event producer fills in details and creates performances, you will see the progress bar below the festival / season logo creeping up. Once it hits 100%, the festival / season has all the information they require and you will be invited to ‘Finalise’ your event. At this point the event may also be required to pay a registration fee. Remember, if you haven’t locked participants out they can (and in most cases should) complete, finalise and pay for their own registrations.
Advanced Features
In addition to what is described above, Eventotron has a number of features that can help you run your venue as part of a festival / season or independently. These include:
- Create your own application forms.
- Gather additional information from events.
- Programme your venue on a calendar with drag and drop editing.
- Directly charge events for marketing, technical and other services.
- Generate invoices.
- Create auto-filled, customised contracts and other documents.
- Create digital ‘Departure Boards’.
- Invite events from the entire Eventotron database (currently 25,000+ events).
- Set default and /or locked answers for all events in a festival.
- In-depth reporting and data export.
If you are interested in any of these features please contact venues@eventotron.com
That’s it
Thank you for taking the time to read this guide. If you have questions about using Eventotron then please email us at help@eventotron.com with as much detail as possible, including the name of your venue and the festival/ season it is part of (or applying to). If you have questions about a festival’s / season’s policies or application process, please contact the festival / season directly.