With hundreds of pieces of equipment and software available to help you record your music in both digital and analogue formats the world of sound recording has never been more accessible. But where to start? Here’s a beginner’s guide to set yourself up with an effective home-studio with minimal expense.
Technical
Let’s start with a focus on the world of budget digital recording. Analogue is great, but your cheapest and most versatile option is digital. It’s also useful to know the technical terminology related to sound recording. This will help you better understand what you need to do, as well as communicate with other professionals if, and when, you need help… (we all need help sometimes!) The sound recording process can be broken down into three component parts:
Tracking
Tracking is a technical term for the process involved in recording your music. Tracking literally involves laying down individual tracks (or stems) in whatever recording device you are using. More often, this will be a multi-track recording where several instruments are layered (or overdubbed) to create a full song or recording. The aim here is to create your song. This where the creativity happens! Pro tip: Always know where you want the recording to end up before you start. Having a clear direction is going to save you time and effort with re-recording. Plan before pressing record.
Mixing
Mixing is the process whereby the volume, dynamics, and position of each of these individual stem-tracks are adjusted. The aim here is to ensure they can all be heard individually, whilst being balanced against the other tracks. Pro tip: Little is ALWAYS more so make sure you bring your individual volume levels down. You want to leave volume headroom for the mastering process.
Mastering
Mastering is all about space and bringing the final level UP. The aim here is to standardise the final recording so it fits with other reference recordings. Essentially, ask yourself, does my song volume fit in a commercial playlist? Pro tip: Find a reference song that is close to your genre and aim to for that volume level. Learn how compression and EQ works. Cut unnecessary frequencies.
Equipment
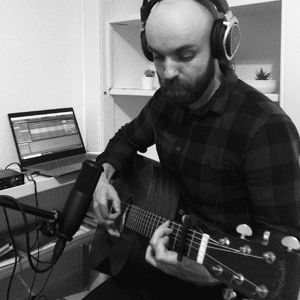
Okay, so we know what we want to achieve with the three component parts of a recording. So, what’s next? Which equipment is going to help us do that? There’s so much equipment available but ultimately the answer boils down to this… You need a device that can capture audio. For digital recordings a computer, a dedicated digital audio recorder or even a mobile phone could be used. If you can capture the sound, you can make a sound recording. Laptops are my recommended device for those on a budget who can afford a little investment. For ease in this discussion, we are going to assume you have a laptop. A good beginner’s set-up requires the following:
LAPTOP/ COMPUTER – High memory and a quick processor is useful but even an entry-level laptop will work! If you can, buy this first.
Price: varying but budget/second-hand versions are also options!
AUDIO INTERFACE – An audio interface is essentially an upgraded soundcard for your computer. It’ll be better than the standard one inside your laptop and will give your processor less to do when playing back multiple recorded tracks. If you intend to use instruments, it also provides an easy way of plugging them into your computer AND it will even power condenser microphones. If you have anything left to spend– buy this second.
Price: below £100 / US$125.
DIGITAL AUDIO WORKSTATION (DAW) – You will hear a lot of chat about DAWs. What DAW do you use, which DAW is best for etc. Answer: who cares? If it records your music, it works. This is the software that will let you save your stem-tracks. There are many available and each have HUGE user manuals. You’ll never learn all of it, so focus on what YOU need. My recommendation for a low-budget DAW is Presonus Studio One 4. It’s a great system to start with and will let you get familiar with multi-track recording without investing in a DAW. Another useful DAW is Garageband for Mac users.
Price: Free
MICROPHONE – Microphones generally come in two types. Dynamic and condenser. Dynamic is the typical stage microphone but they can be really effective in the studio. A condenser microphone is a typical studio microphone. They pick up a LOT of sound and often require a power source. If you’re on a super tight budget, get a dynamic. If you can afford an audio interface, go condenser.
Dynamic price: below £50 / US$62
Condenser price: below £100 / US$125
HEADPHONES – So many options but, as a general rule, make sure you can hear bass frequencies. Earbuds are not a good choice. You’re going to want over the ear headphones. Start there and work to budget. Price: £20 + / US$31 +
Environment
Finally, where you record is half the battle. People will talk about room reverb and creating recording spaces etc. Keep it simple. You want to limit what the sound does in the space. However your performance sounds in the bathroom, is the total opposite of what you want to record into your DAW. Remember, this is digital recording and you can add effects later in the mixing process. You do not need to build a recording studio, you just need to isolate the sound in your environment. If you take anything away from this article remember: THE BETTER THE SOUND YOU RECORD, THE BETTER THE RECORDING WILL SOUND.
Pro tip: Use fabrics to isolate sound. Curtains will stop all room reflections and can be used to line a wardrobe as a makeshift vocal booth. For recording instruments, go ahead and build that giant blanket fort you’ve always wanted and record some great music.
In summary, this is a BIG subject- this is just a quick overview to get you started. The best approach is to research and experiment. There are many free resources online and if you get stuck, isolate the problem, and focus on a specific solution. Don’t be afraid to make mistakes and just have fun! If it sounds good to you, then you’re already on the right track.